How to / Demo
At ChiefOnboarding, we currently don't do demos with potential customers. Demos take a lot of time and are quite similar between potential customers. You all come with the same goal, right? Improving your onboarding process.
Underneath, you will basically find the transcript of a demo. You will get to see most of the features that our software provides and you can easily come back to it, if you want to look something up again. At the same time, we can keep working on features that you want.
As always: if you have a question, feel free to send us an email - we are fast at replying (often within an hour).
Sequences
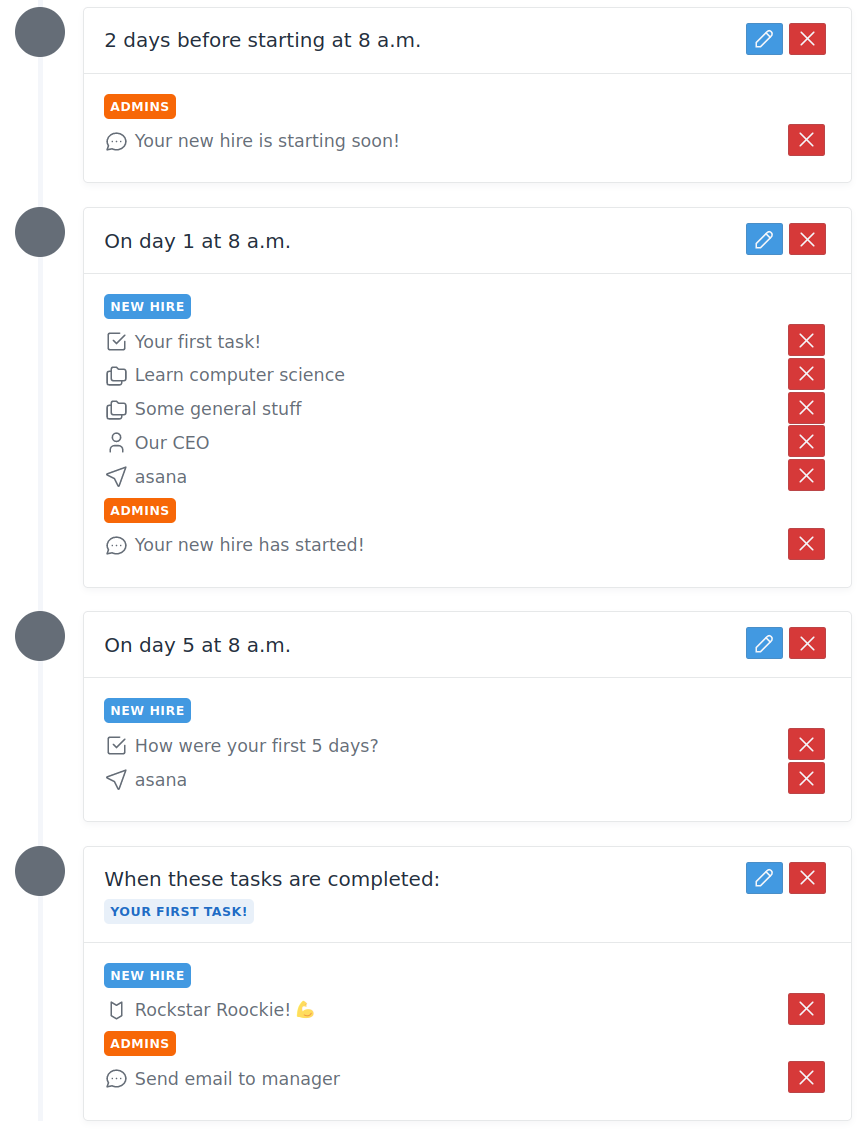
At ChiefOnboarding, we base everything around sequences. Sequences are basically timelines which will map out the new hire's onboarding path. It looks like this:
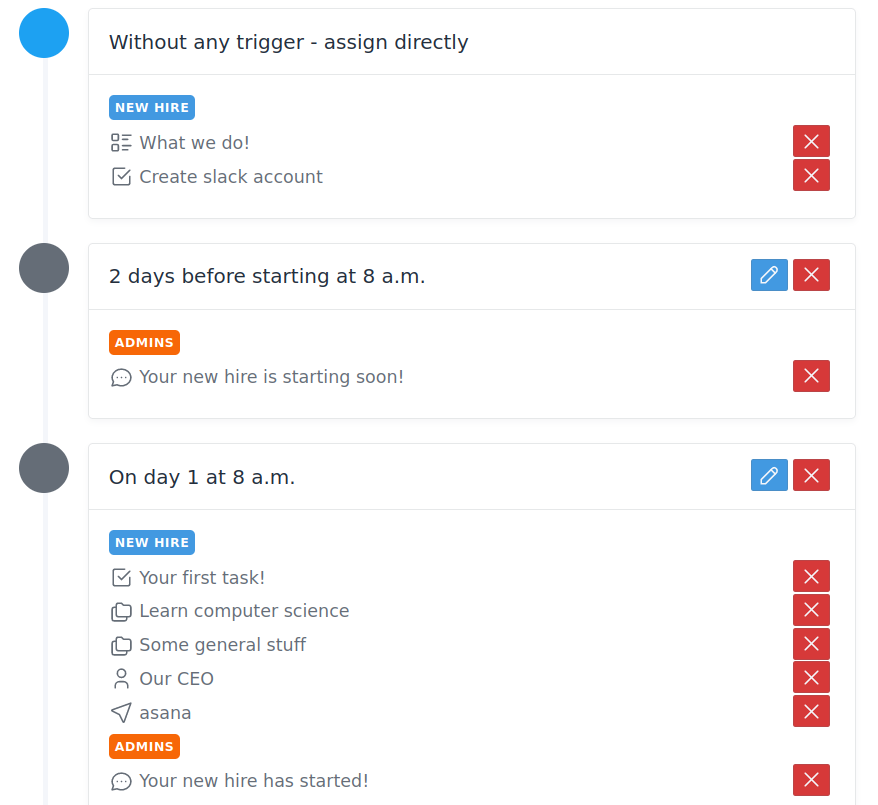
Let's break it down a bit:
Sequences consist of blocks. We currently have two types of blocks:
- General blocks
- Block before the new hire starts
- Block after the new hire has started
- Block based on the completion of a to do item
- Unconditioned block
The general blocks
There are three types of general blocks that you can choose from. You can create a block that triggers before the new hire starts. You could use this to create tasks (we will get to this later) for colleagues for things they need to do or send some emails/slack/text messages.
The second type of general blocks are the ones that start after the new hire starts. These are marked in workdays, so it doesn't really matter if your new hire starts on a Monday or Thursday - ChiefOnboarding will skip the weekends and not bother the new hire on those days. Example: Monday is workday 1, next week Monday is then day 6. You can add a bunch more in these types of blocks (which we will get into in a bit). We will notify the new hire of any newly added things - you can disable this if you don't want that.
All of the above blocks trigger at 8 AM in the new hire's timezone. Yes, ChiefOnboarding is totally remote friendly, we support multiple time zones and multiple languages.
The third type of general block is a special one. You can have things happen based on a to do item. We will get into to do items in a bit, but basically what this means is that you can wait for your new hire to complete a to do item and then it will trigger to create a new to do item for the new hire or perhaps send a message to a colleague. The possibilities are endless.
The unconditioned block
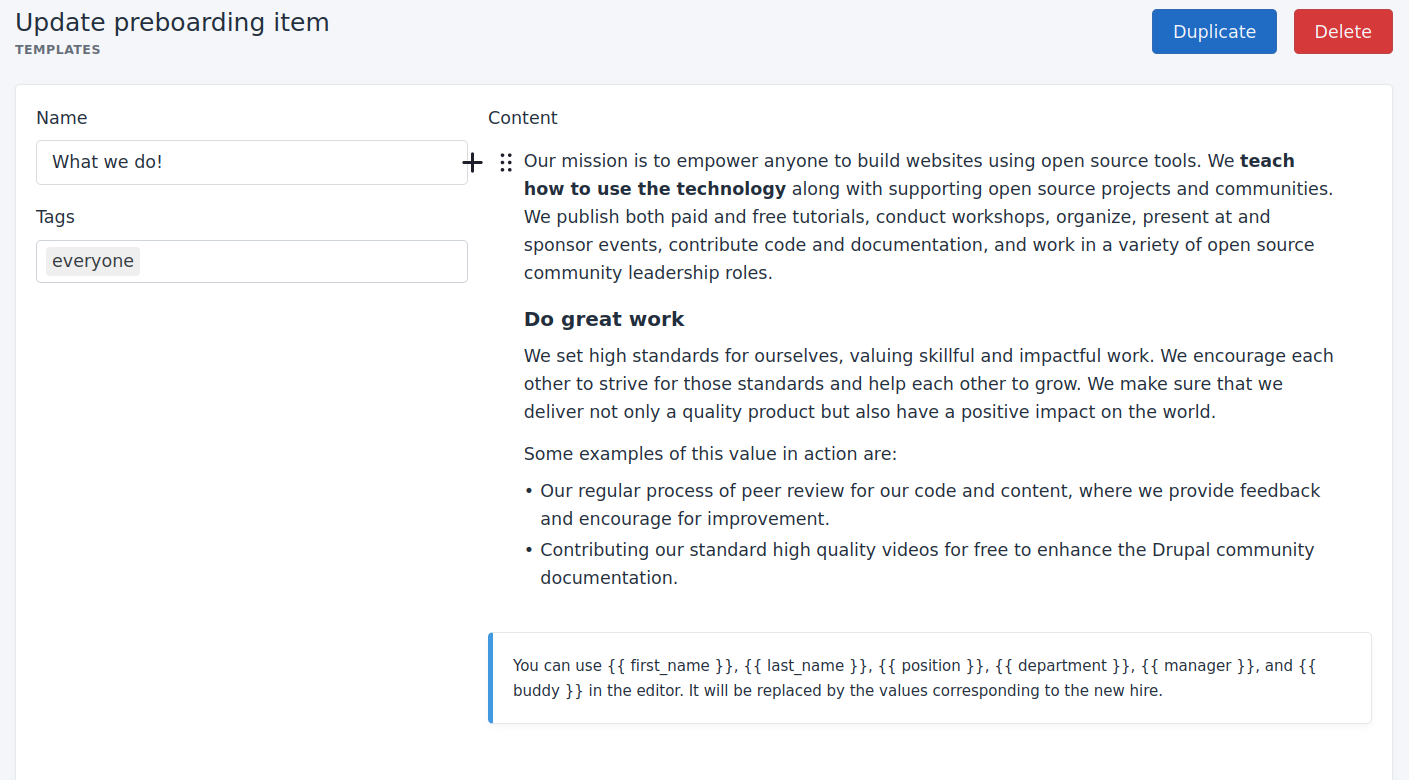
You can only add one of these and you can add things in here that are automatically added to the new hire when you add the sequence to your new hire. You could add some random stuff in here that your new hire might need or that they need right from the start. Think of some policies and some default to do items.
Also often used to add preboarding pages that your new hire will be able to see BEFORE they join the company. A pre-boarding page basically looks like this:
And you can preview it with the preview button, it will look like this:

You might have noticed the little part at the bottom that says "Form options". You can actually build a custom form where you can allow your new hire to send some information back to you. Perhaps you want to know what their favorite snack is.
Templates
So what could we put in these blocks? We have created a few different types of templates that you could add in these. You could create those templates before you start to create the sequence, but you can also just add items as you go.
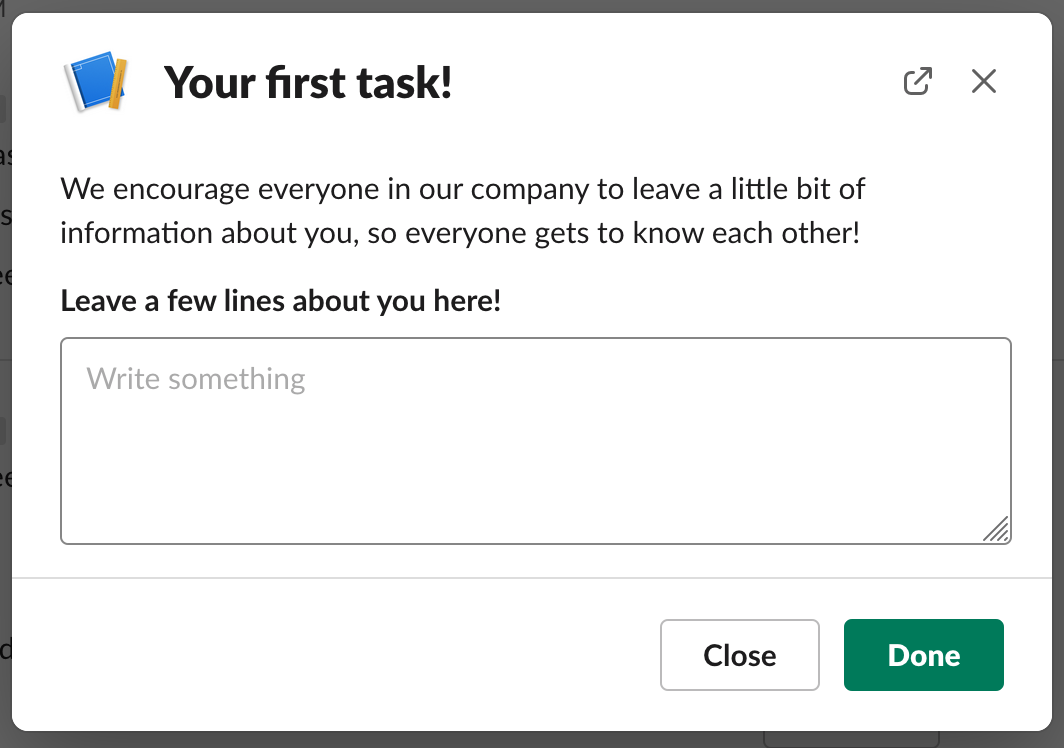
To do items
To do items look like this (for you):

Let's break it down a bit more.
I think the title speaks for itself: it will be displayed to the new hire with that.
The Due on workday field will allow you to add a workday on when the tasks needs to be completed. New hire's will get a notification of that in Slack/Webportal. Remember: this is workdays, not calendar days. If Monday is day 1, then next week Monday is day 6!
Then we have the Tags part. This is just a means of identification for yourself and other staff members. Totally optionally, but just something for you to separate tasks that have the same name. New hires will never get to see the tags.
The content is basically a WYSIWYG editor that allows you to add various things. Such as headers, lists, files and images. You can even create forms in these if you would like to get some info back from the new hire.
At the very bottom, you have a quick check box (only available with Slack integration), which is currently checked. This means that the answers from the new hire will be sent back to the Slack channel that you specify there. It's best to make the new hire aware of this, so they don't add anything they wouldn't want to share with the rest of the team. This feature is perfect for when you want to let your new hire introduce to the team with a default format.
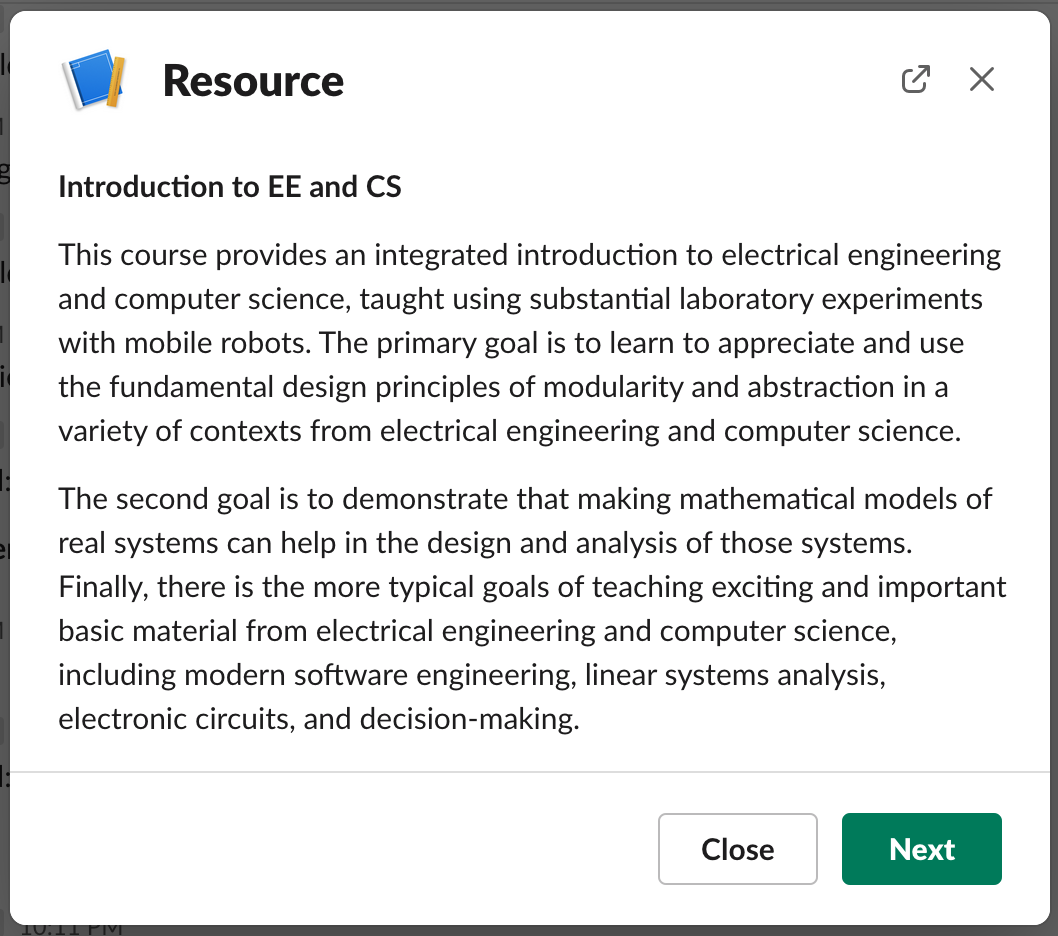
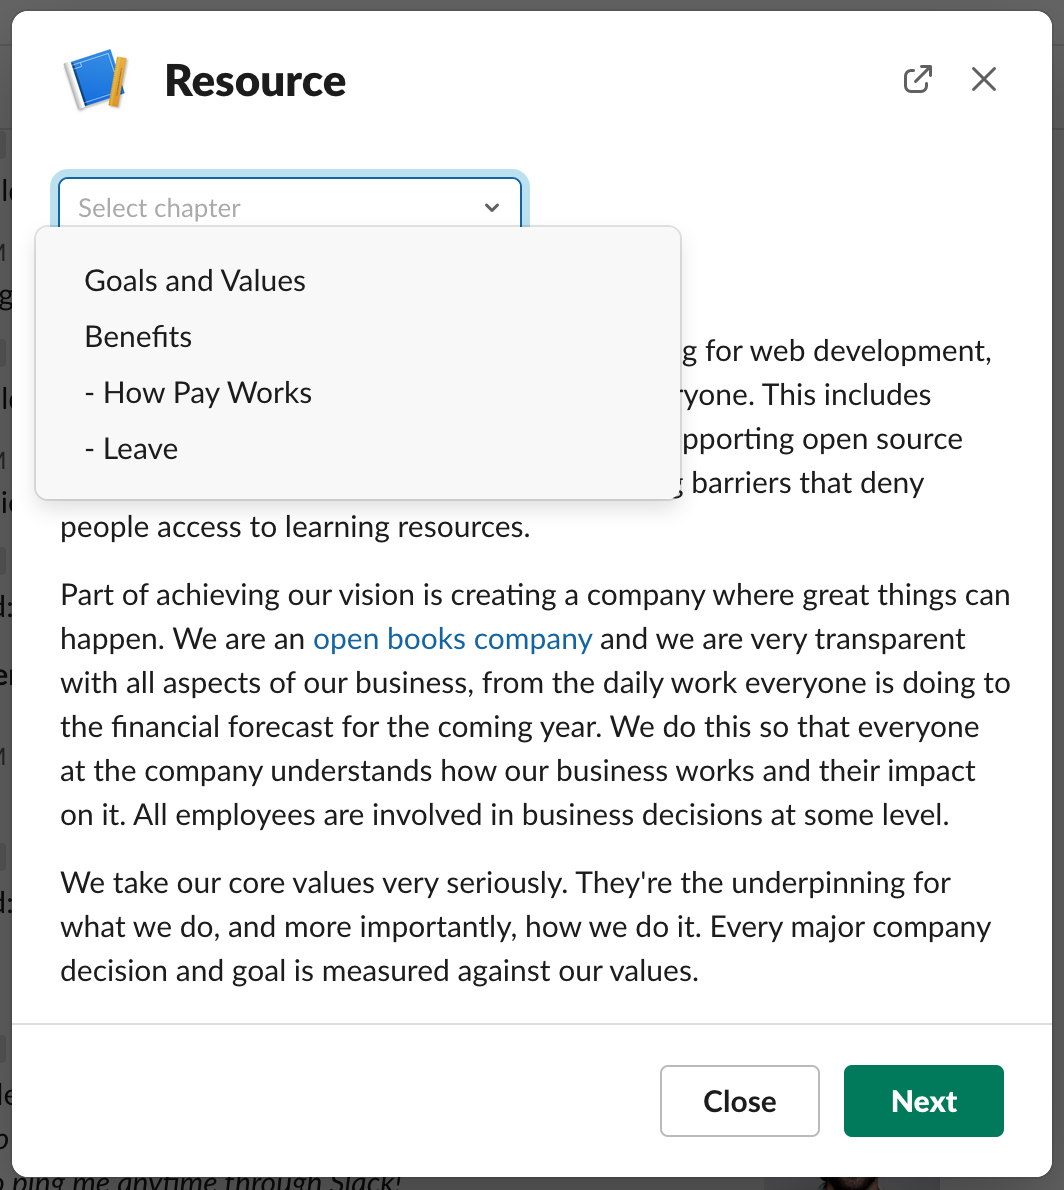
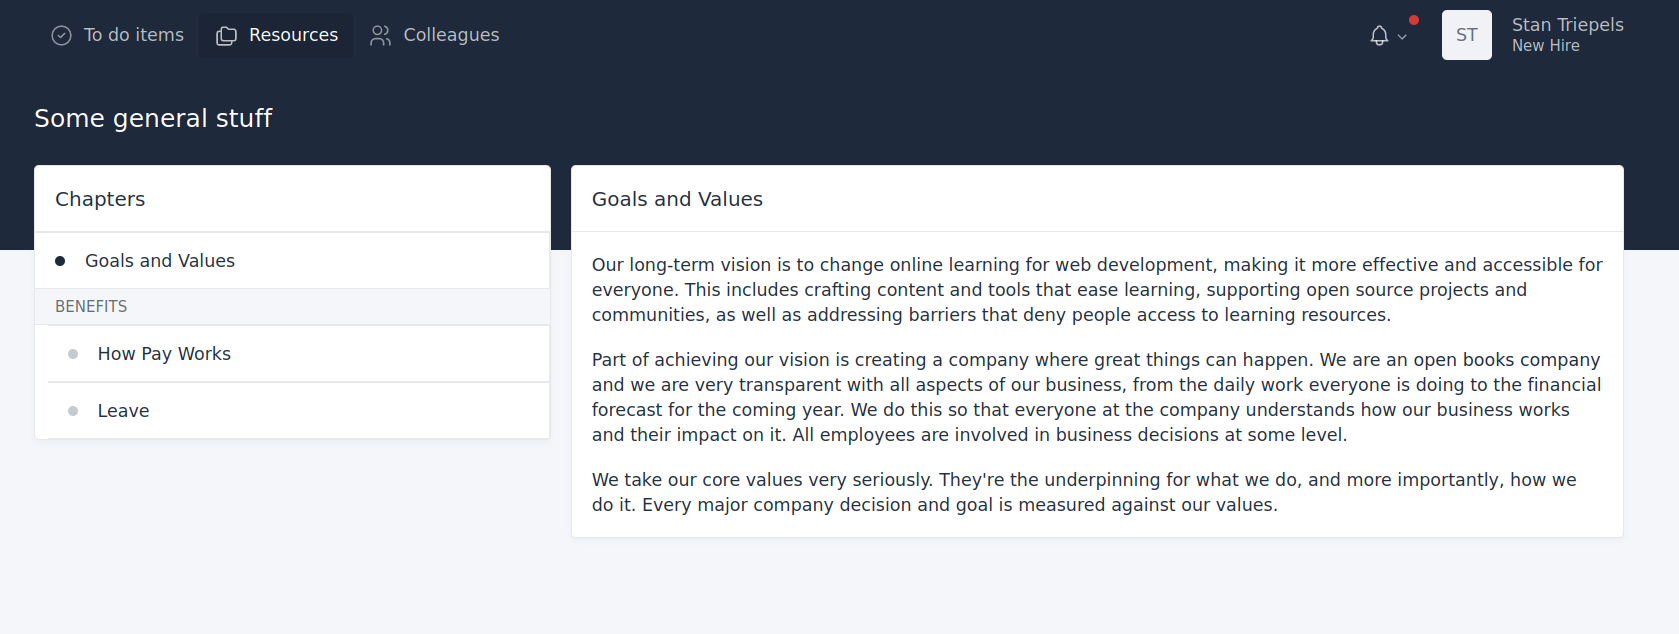
Resource items
Resource items are meant to inform your new hire. Think of general procedures, how to use specific tools etc. Resources look like this (for you):
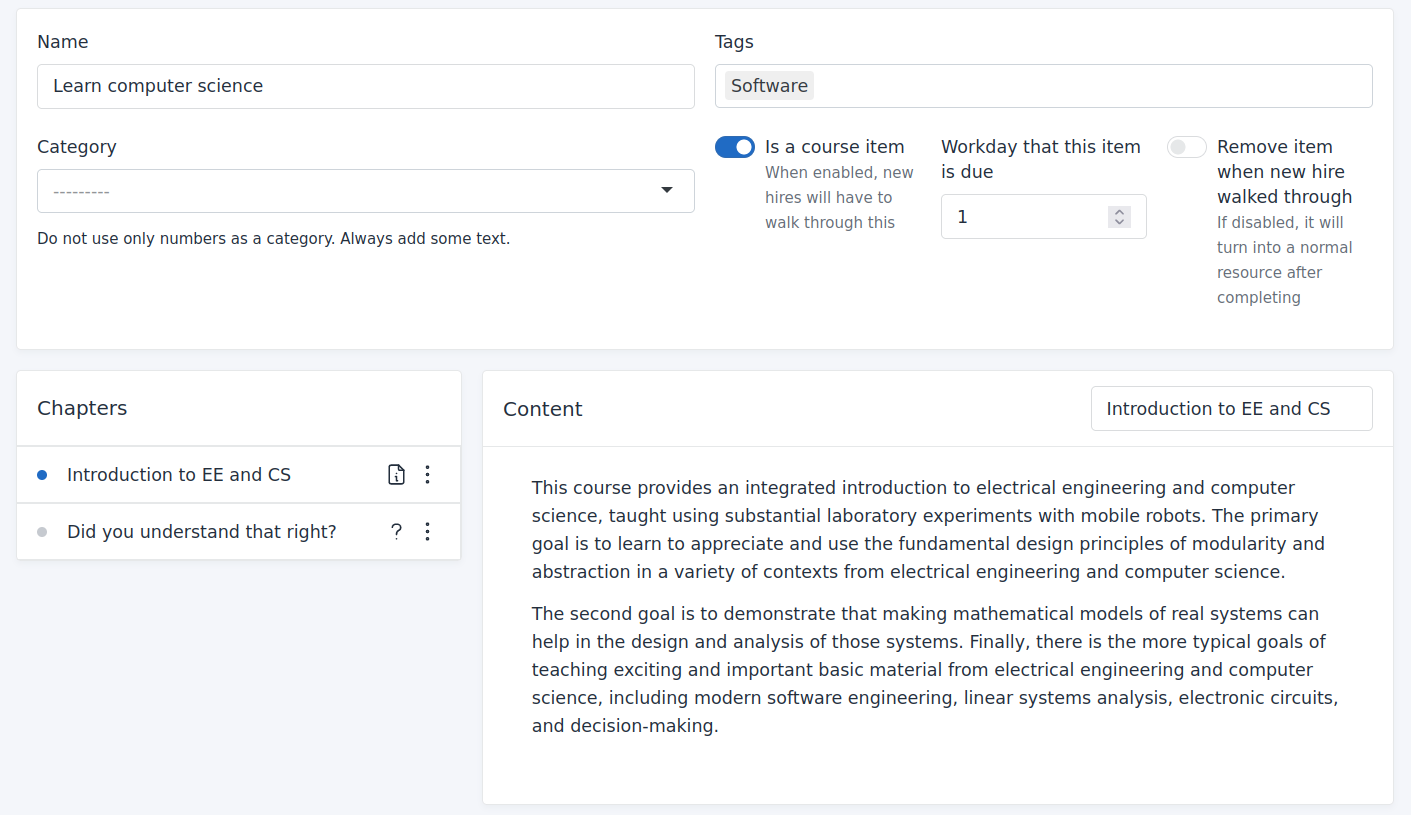
We already covered the title, tags and content part - they are the same as with the todo/preboarding items. Something new here is the 'Chapters' part. The name already gives it away, you can create chapters in these resources. This comes in handy when you want to split information a bit more (in the event that headers aren't enough). By default, you can't really check if the new hire indeed read/understood what was in the chapter. To solve that, you could turn the resource into a course (see the switch 'Is a course item'). If you enable that, your new hire will have to go through the resource chapter by chapter. You could also add questions in between the chapters, so you can check their knowledge. You will be able to see the answer that they filled in on your side. The chapter with a question mark icon before it are these test. They can only consist of multiple choice questions. You can also pick or create a category to separate the multiple resources for your new hire.
Introduction items
Your new hire is new to the company and they barely know anyone. Perhaps they know a few people through the interviews, but that's most likely it. Introduction items are items that introduce your colleagues to your new hire. They look like this for you:
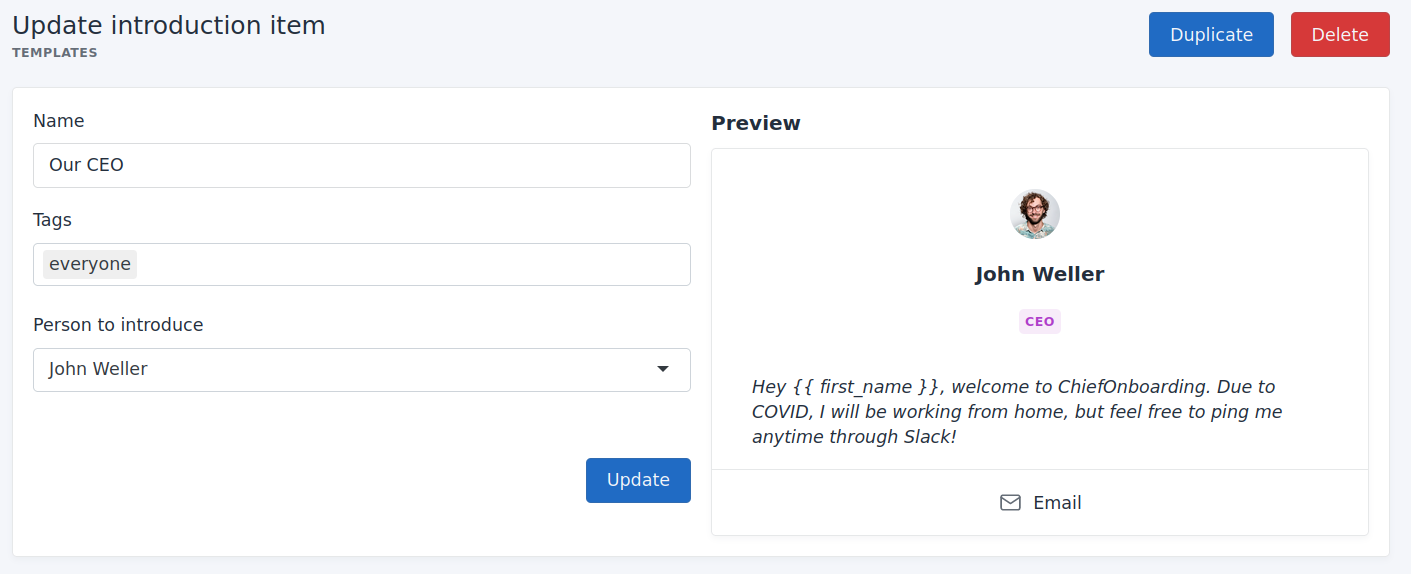
On the right side, you have an example of how it looks for your new hire (in the webportal). Please note that items within the curly brackets, those will be replaced with the new hire's first name. This goes for most fields in the software (including content and title items). You can use these placeholders (within curly brackets):
first_name: new hire's first name
last_name: new hire's last name
email: new hire's email address
position: new hire's position
department: new hire's department (if any)
buddy: new hire's buddy's full name
buddy_email: new hire's buddy's email address
manager: new hire's manager's full name
manager_email: new hire's manager's email address
Badge items
Badges are a way to keep your new hire motivated. You can't really do much with a badge, it's just there to give your new hire that extra bit of positivity between going through all the boring tasks they need to complete.
![]()
Admin to do items
Sometimes, you or any of your colleagues need to do something for your new hire as well. With these items, you can automatically create a to do item for someone. You can assign it to someone and you can also notify someone else of this.
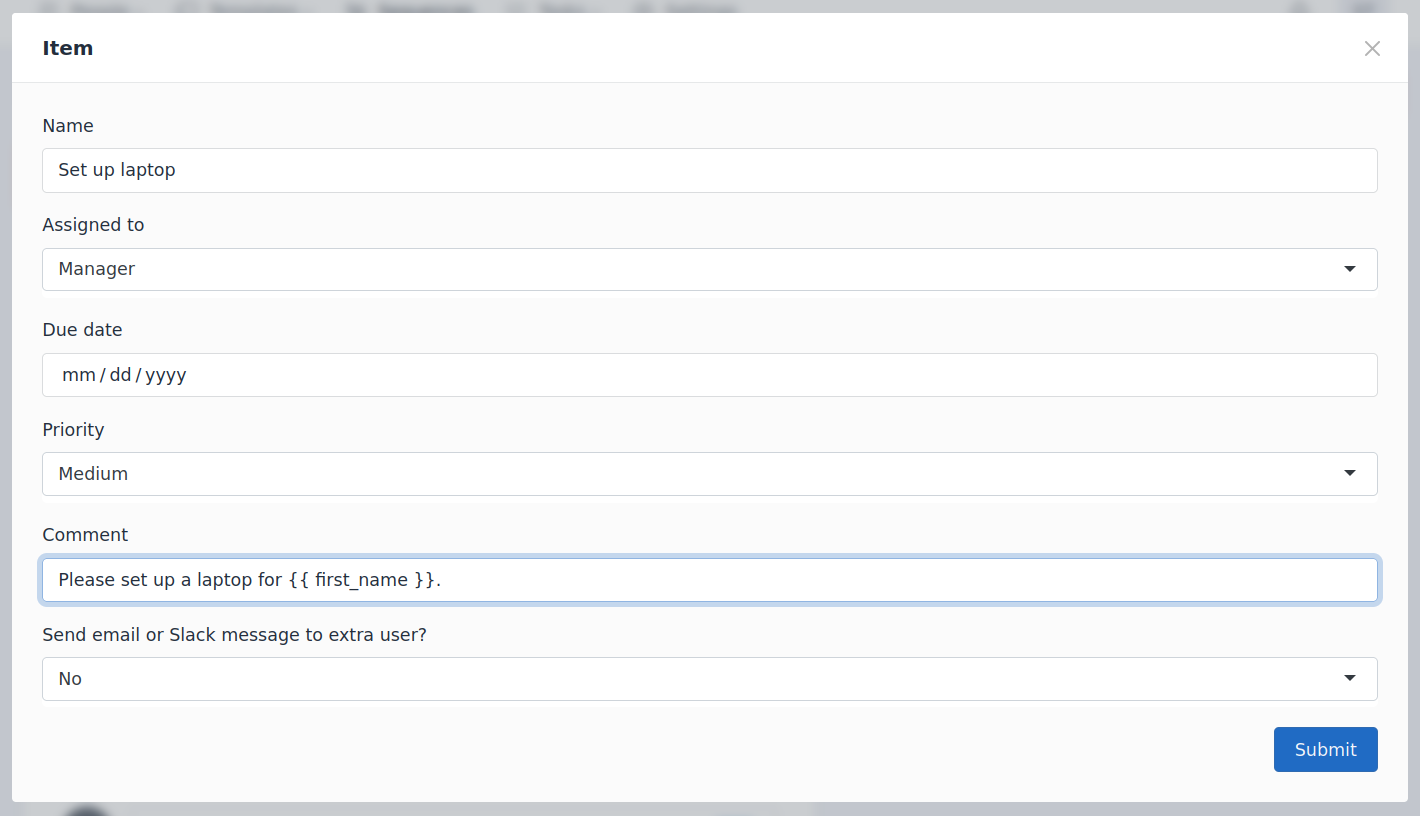
They will get a notification of this through Slack or email.
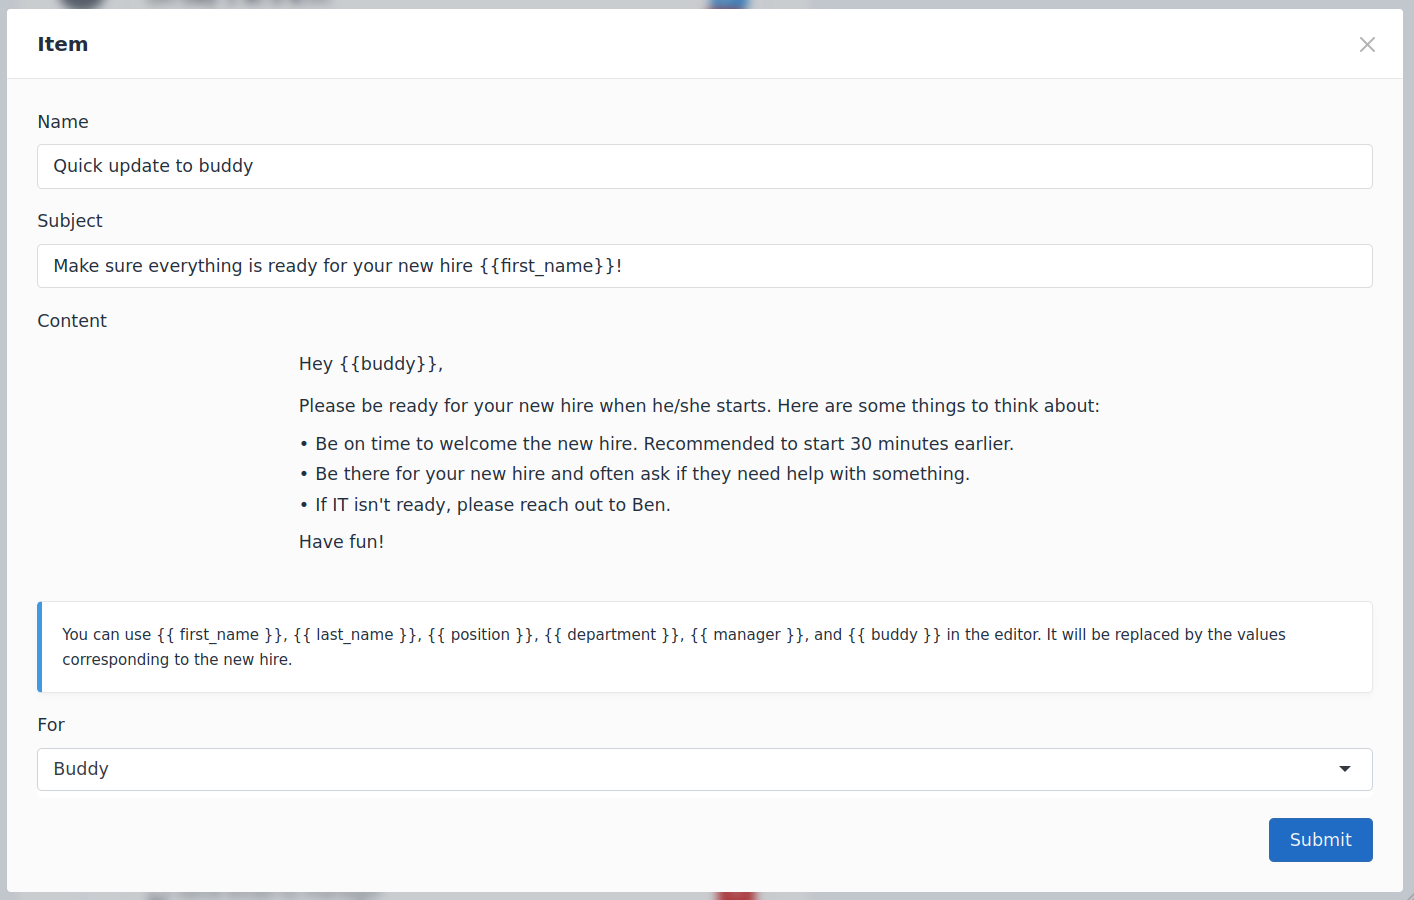
Text/Slack/Email messages
I am going over those all at once as they all have the same purpose: Sending a one-off message to someone. This 'someone' could be the new hire themselves, the manager or buddy assigned to the new hire or some random person that you can pick yourself (or in the case of Slack; a channel is possible as well).
Here is an example of an email message:
Here is how the bottom part of our sequence looks like now. Now, this is only a really small sequence and you can make those as large as you want. You could also stack them - adding multiple sequences to one new hire.
People
Everyone that is in ChiefOnboarding is listed under 'People' -> 'Employees'. Those include all new hires, administrators, people with no access to the dashboard and people that have limited access to the dashboard. Let's break it down a bit more:
Administrators
Administrators are people that have full control over the dashboard. They can create new hires, remove them, create sequences and templates and so on. You can create as many as you would like.
Administrators with limited access
Optionally, you can add people with limited access. They have access to their new hire's (being the manager), the templates/sequences and their admin to do items. They will NOT have access to settings items.
Employees
Employees are basically empty accounts. They don't do much by default. They will show up on the colleagues page, but that's basically it. You can import them from Slack to quickly have them all listed here.
If you want, you can assign resources to these people and then they will be able to use the Slack bot and online webportal too look into these. Resources don't have to be just for new hires - they can be useful for long time employees as well. The colleagues page will be accessible for them too then.
New hires
You can create new hires in three different ways:
- Filling in the form in the dashboard
- Using the API
- Automatically adding new hires when they join Slack (with or without manual approval)
Filling in the form
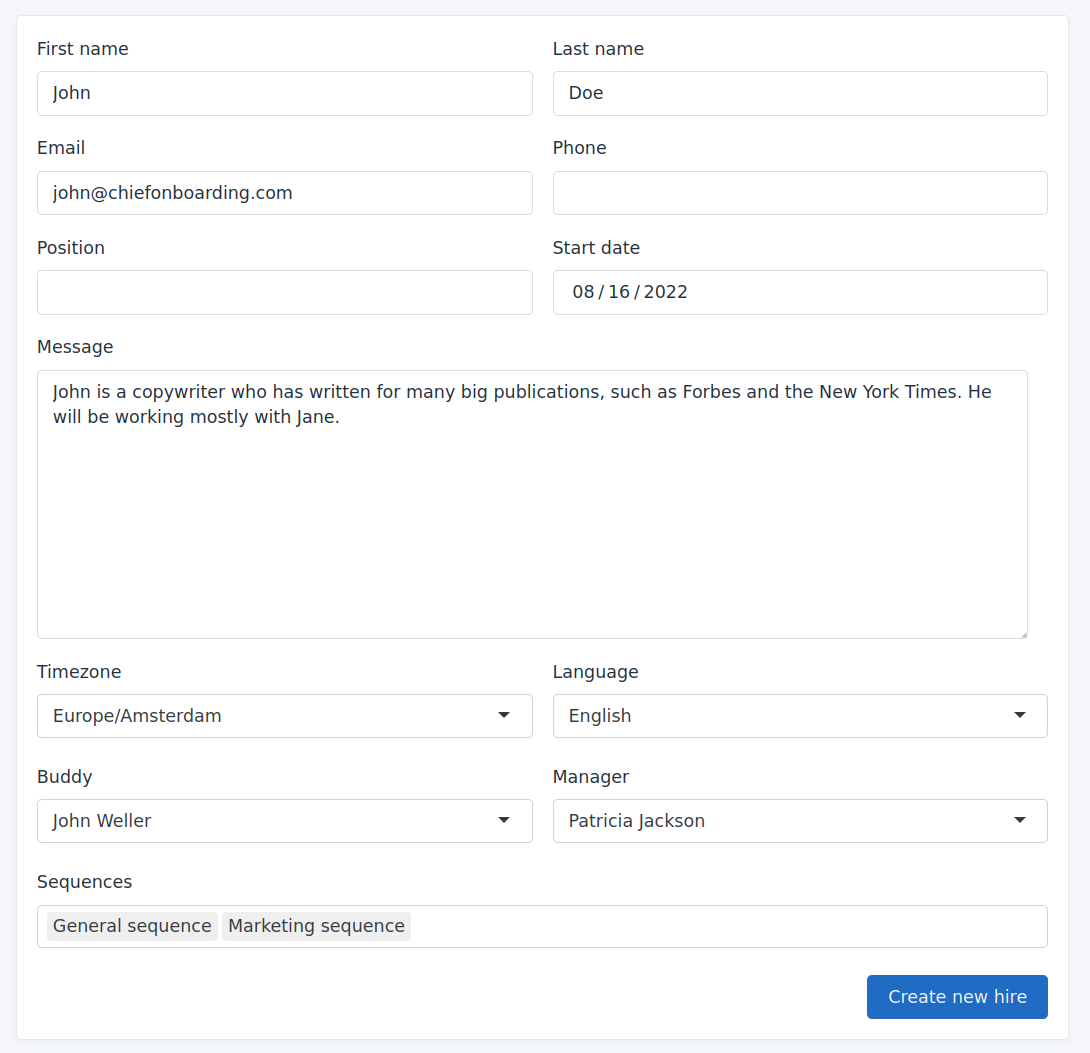
Let's look at each form field:
First name: The new hire's first name
Last name: The new hire's last name
Email: This is the email address from the new hire - the corporate one
Phone number: This is the new hire's phone number (used to send sequence text messages to or preboarding page invitations)
Position: This is the new hire's position or title. Only used for introducing the new hire
New hire's starting date: The day the new hire starts working.
What can you share about this new hire?: This is the message that will be send to the team to introduce this new hire. Colleagues will be able to leave a personal welcome message if they want to.
New hire's timezone: Mainly used by the slack bot, but also for sending some emails. No one likes getting messages in the middle of the night.
Language: We currently support English, Dutch, French, German, Turkish, Portuguese, Spanish and Japanese. Please note that language support is still under development - some parts might not be translated properly yet.
New hire's buddy: This is the new hire's buddy, you can use this field for sending messages in the sequence.
New hire's manager: This is the new hire's manager, you can use this field for sending messages in the sequence.
Sequences: This is the part where you can assign your pre-made sequences to the new hire. If some items won't be triggered (because you created the new hire later than the first item in the sequence), then you will git a popup asking if you want to trigger those items immediately.
Once created, you can choose to send the new hire's preboarding email. This one is not sent automatically, as you might want to make changes before you send it (this will be implemented as part of the sequences later on though).
Using the API
Please go to the API doc page for instructions on how to set this up.
Automatically adding new hires when they join Slack (with or without manual approval)
In the settings, there is now the option to enable 'automatic new hire creation from people joining Slack'. When a new hire joins Slack, ChiefOnboarding will get notified and it will automatically create a new hire account for them. It will also assign one or more default sequences to the new hire. No manual action is needed here - everything is automated.
Optionally, you can also enable another setting that sends you a message to manually allow/deny a new hire account. When a new hire joins Slack, you (or someone else) would get this message:
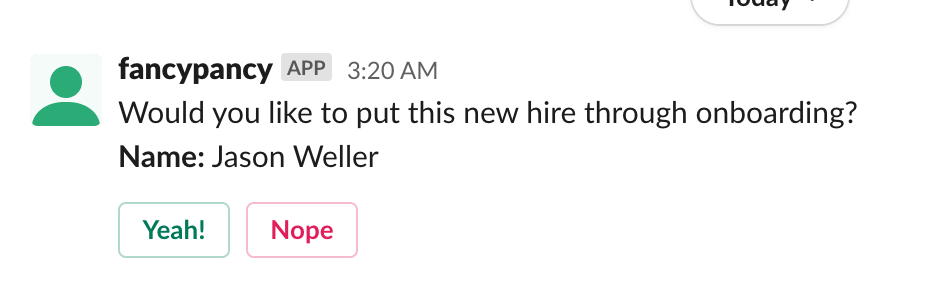
If you click on 'Yeah!', then you will get a popup where you can choose the sequences you want to assign to them.
New hire's Slack bot
You can customize the bot however you like. Use your own name for it and profile picture, so please ignore the current name / profile picture of the bot in the pictures below.
When a new person is added, the bot will send a message to the team letting them know someone is starting soon. 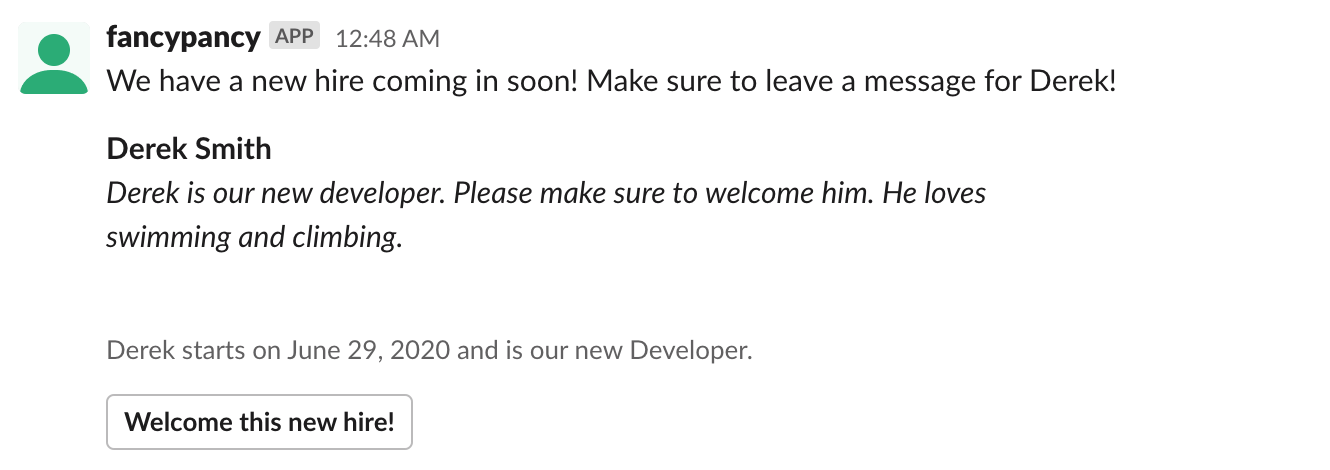
They will be able to leave a personalized message for the new hire. This will show up on their pre-boarding pages as an extra page with all the messages from colleagues.
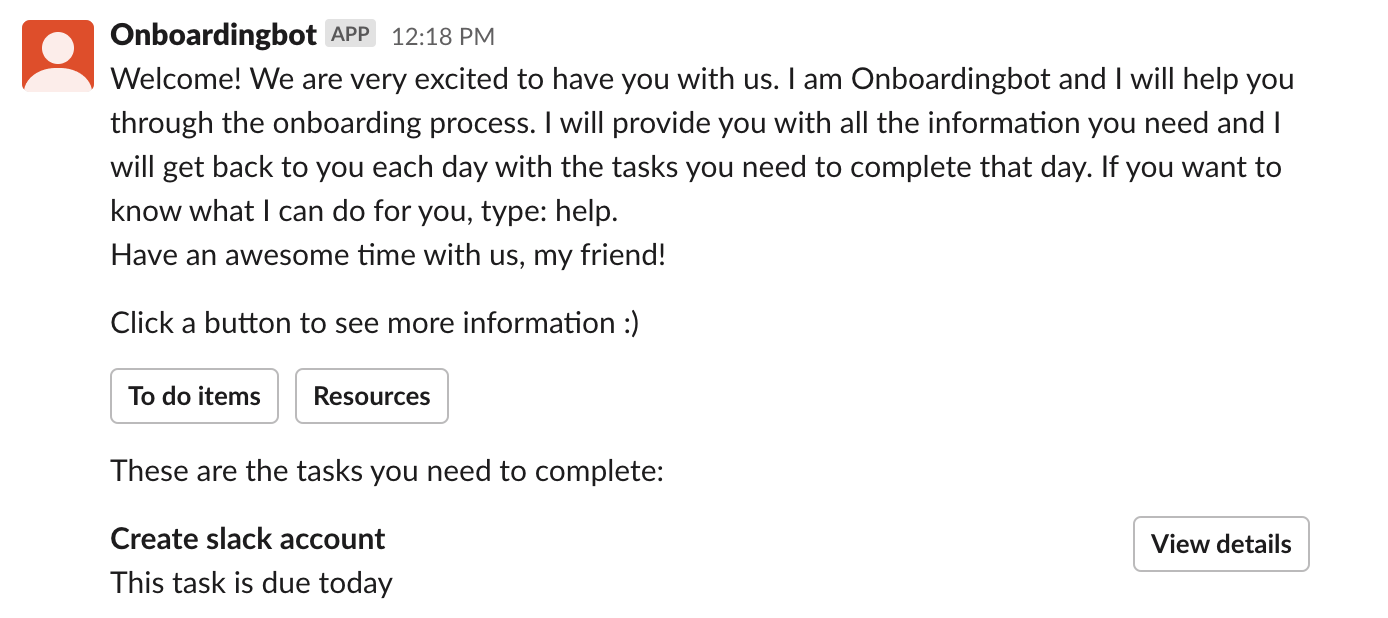
This is the first welcome message that is being sent to your new hire when we found the new hire in your slack team (we check every 15 minutes if there are new people in Slack, so it could take up to 15 minutes to find your new hire). You can customize this message of course to anything you like. The buttons are also optional. Along with the message, it adds the to do items that are due for that day. These are mainly to do items that are added under the 'unconditioned block' (see sequences above). Items that are added later, will be send to the new hire around 8am in the morning. The new hire will be notified for new to do items and to do items that are due (or even overdue).

Forms work within Slack as well, with the exception of upload fields. When you use an upload field, we will redirect the new hire to the website to complete this (they don't have to login for this).
Courses will look like this:
They can't skip through lessons, they will have to complete them one by one, before it's marked as done. Once a course is done, it will turn into a resource, so new hires can look through them even after they completed it.
Resources look like this:
As you can see there, they can pick any chapter they want.
An introduction in Slack will look like this:

New hire's web portal
Now, most people will use the Slack integration. The web portal is more of a fallback to when a specific team in the company isn't using Slack. You can use the Slack integration standalone, but you can also use the web portal standalone. Both have all features. It's not recommended to mix them up as the Slack bot might have to do items that might have been completed already in the web portal. But, ultimately, it's up to you to decide.
The to do area looks like this:
A specific resource could look like this:
Resource that are being used as courses can contain questions and that looks like this:

You are able to view the answers in your dashboard.
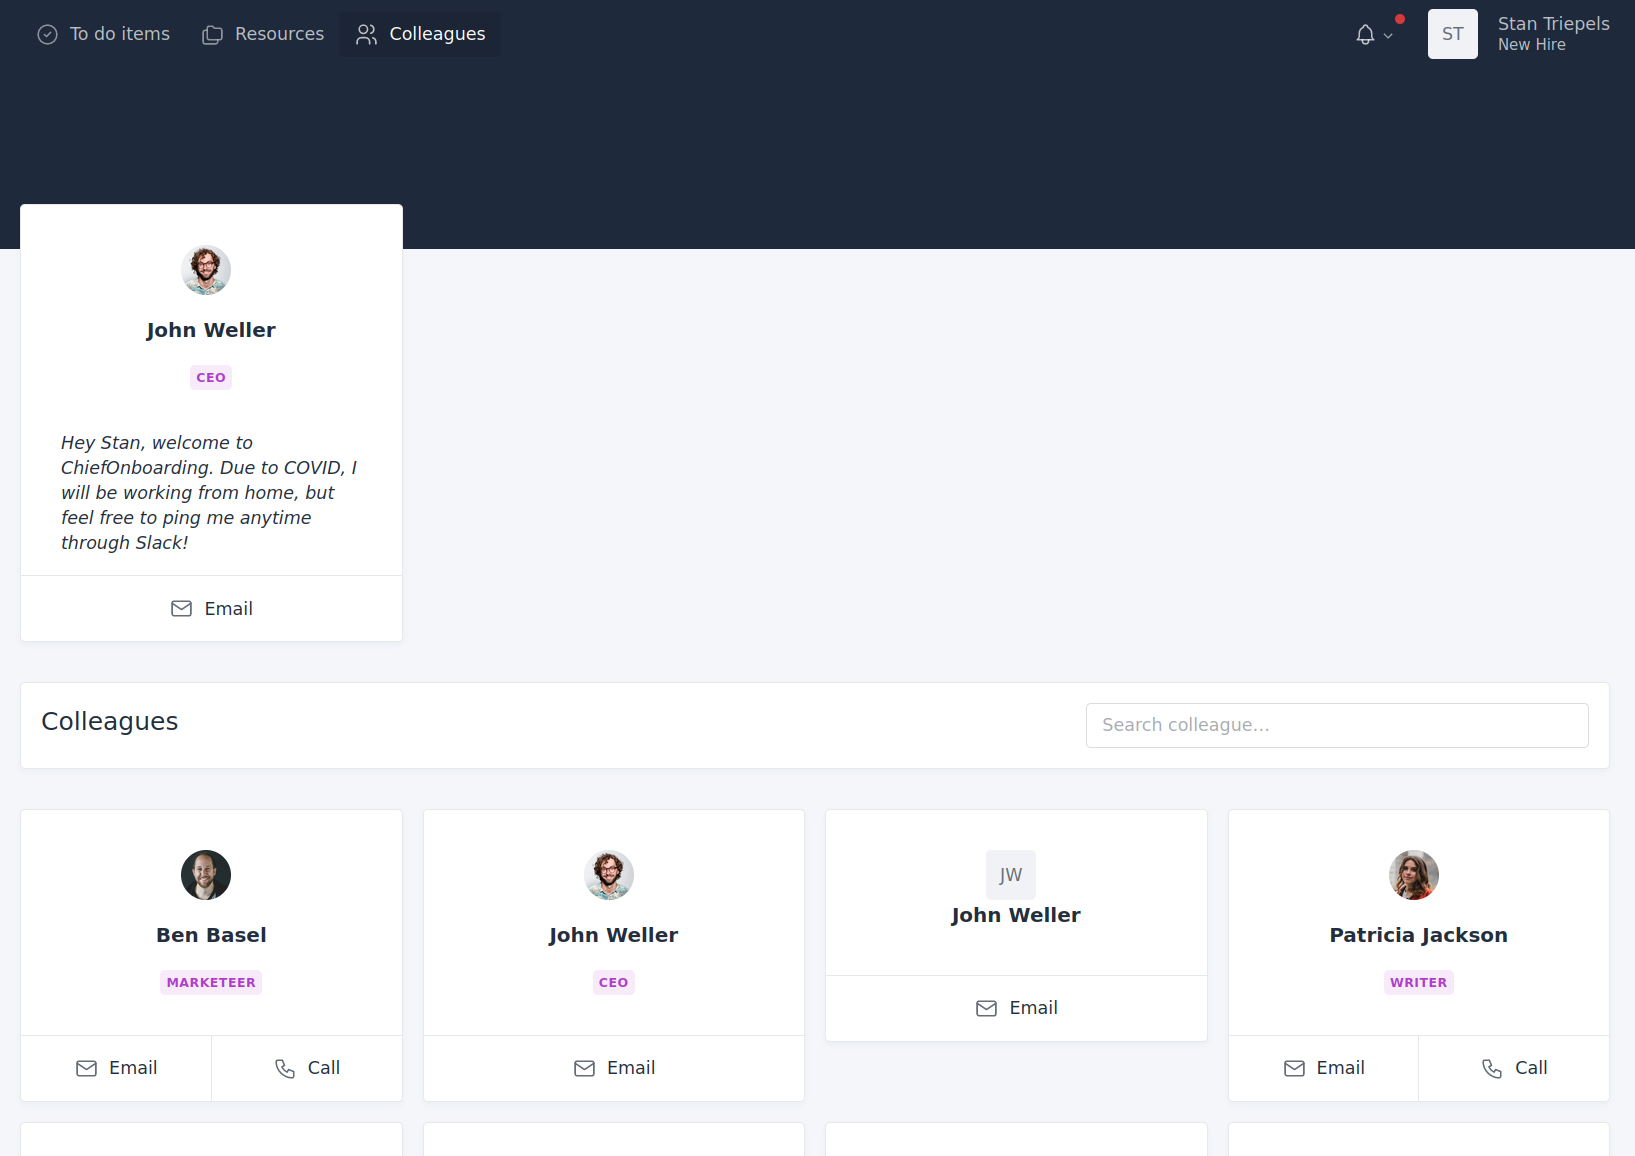
There is a colleagues page that your new hires (and also colleagues that have been with you for longer) can visit to see everyone.